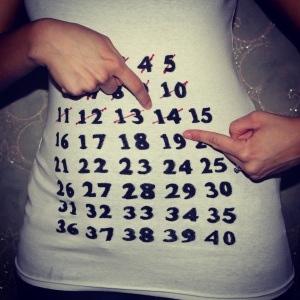
We’ve just entered our 14th week of pregnancy. I’m finally starting to show so we’re starting the maternity pictures! On my inspiration search through Pinterest, I stumbled upon a tutorial to make your own pregnancy countdown shirt!
Here’s what you’ll need:
- A black Sharpie or Fabric marker (I managed to find a Sharpie that wrote on fabric)
- A red Sharpie or Fabric marker (No fabric Sharpie, hoping this one doesn’t wash out)
- A white t-shirt or tank top (Something stretchy, remember this has to fit until delivery!)
- A computer and a printer to print out your numbers
- A ruler
- Pieces of cardboard to place in between your shirt so the Sharpie doesn’t bleed through!
Start by printing out your numbers. I opened up a Word Document on my computer and typed up the numbers 1-40, 5 per line, in a font size 88. You can go bigger or smaller, 88 just seemed to fit on the page well and the numbers were well spaced out so I went with it! To make your numbers fit you might have to edit your page layout. Put the margins at 0 everywhere. Now print!
Gather your Sharpies!
And your shirt! I found this bad boy at a local store here in Korea! It was under $5 and free size, super stretchy! 🙂 Definite score!
Now place the cardboard in between your shirt and line up the numbered paper sheets where you want them. I tried on the shirt first and made sure I was starting low enough under my bosom!
Now the fun part! Totally kidding, this was a very tedious task. I had to take a break midway through because my arm was starting to hurt and it wasn’t even the hand I was using to trace and color!
So trace your numbers. I found that tracing all the numbers first made it easier. Then you can just go over it afterward and fill in the numbers.
Quick tip: When tracing, kind of stretch out and hold the fabric around where you’re tracing. Same for when you’re coloring in the numbers. It makes for less mistakes, at least for me it did! I also found myself dotting the Sharpie a lot to fill out my numbers.
Don’t worry about it looking perfect. Remember this is a DIY project! And if you’ve never drawn on fabric before, you will soon learn that it’s a tough task!
Once you’ve filled out all the numbers let it sit for a while so the ink can dry properly!
Then start crossing out your numbers using a ruler and your red Sharpie! My lines aren’t consistent and it definitely looks DIY!
Here is what it looks like on!
And the heart over the number pose:
Voila! You’re all done!
I really love that I made this shirt! I didn’t do much picture taking or pregnancy tracking the first time around so I definitely plan on making up for it this time around! 🙂


Love this idea! I wish I had something like this when I was expecting! I only have the traditional pictures from the photo studios! Good Luck, and feel great!
Thank you abbbz!
very cute! might have to do this 🙂